12.31.2013

Starting your own garden in 2014!

I wanted to start out the New Year with a Beginners Guide to Gardening.  I am keeping it simple and attainable for all of you who want to try digging in the dirt this Spring! 


I personally think that gardening is amazing because you design your garden around your individual needs!  You can start a small garden for little cost and effort and great rewards. Before seed packets start arriving at your local stores take some time to do the 4 steps below to prepare to garden in 2014!


STEP 1: Choose a sunny location
Take a look at your yard, deck, patio, and flower beds.  Where would be the best location for your garden?  Choose the location that gets at least 6 hours of sunlight a day (preferably 8 hours). From 9am to 4pm is when the sun is at its peak intensity which is the best time for your garden to receive light.  You can alter the other factors for your garden but this one is a consideration that can't be changed. 

My other suggestion is to keep the garden in view from inside your house.  That way you remember to water, check and monitor pests on a regular basis.  Then you are also able to look at your plants growing daily.
Raised bed garden
STEP 2:  Choose the type of garden:
Container gardening , planting directly in the ground, building a raised bed, growing vertically and more!
Bush Zucchini plant grown in a container on the deck
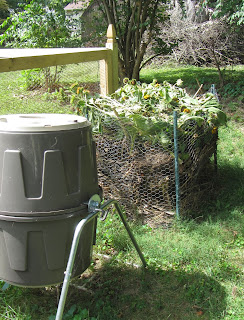
You don't have to start with raised beds.  Our first year (2010) I had a small 4' x 4' bed with a metal chicken wire fence around it (see picture below of compost pile which used to be my garden!)  It was cheap and easy to construct.  It also gave me the confidence that I could grow plants which then inspired us to expand the garden.  So starting small is smart.  That way you have time to learn and figure out what you like to grow, adjustments to make for the future and your favorite style of gardening. Doing a little research now before the spring will get you prepared.
Our first 4' x 4' garden (behind the compost tumbler) it now serves as our leaf pile.
STEP 3: (The secret is out) The better your soil the better your garden
Out of all the steps this is the most important (other than sun) to the success of your garden.  I would not recommend just going out to your backyard and loosening up the soil and planting.  You can do that if you choose and you can also add different matter to this soil to improve it.  Just keep in mind this typically takes about 6 years of work which is a significant time requirement.

Your garden needs well drained, loose, light, nutrient rich soil full of organic matter.  This is one of the main reasons that we selected the raised bed garden over just planting directly in the ground.  When you build a raised bed you have a smaller area to fill with soil.  You can buy all the ingredients for your perfect soil and then mix them together into the raised beds.  There are different options for soil mixes so research this area to decide what you want.  Here is our favorite soil mix that I have shared with my friends and family: 

Our Favorite Soil Mix
taken from: Square Foot Garden (80's version) 
by Mel Bartholomew
Ingredients: 

1 bale of peat moss: 6 cu ft
1 large bag of course vermiculite: 4 cu ft  (get this at hardware store)
10 pails (2 1/2 gallon size) of sand: 3 cu ft
2 pails of wood ashes and charcoal  (we left both of these items out)
10 pails (2 1/2 gallon size) of compost: 3 cu ft
1 coffee can full of lime
1 coffee can full of organic fertilizer
TOTAL volume of mixture: 16 cu ft. 

(This amount will fill one garden block to a depth of 12 in or two blocks to a depth of 6 in.)

Mixing Procedure:
1. Mix all ingredients with a flat bottom shovel. (We mixed little by little in the raised bed....or you can mix it on a hard surface and then move it to the bed).


2. Spray with a hose to dampen the materials (don't soak) as you mix the pile.
 

3. Fill garden block with mixture turning over to mix it well.  Again spray with hose as you mix.

4. Level and add enough additional mixture to fill the raised bed, level again spray once more with hose, and the block is ready for planting. 


Bush Green Beans
STEP 4: Grow only vegetables you enjoy eating
This should be obvious, but when you first start out select vegetables that are easy to grow and that you really love.  You won't ever find parsnips, radishes, or beets in our garden because we just don't eat them.  Some vegetables my family has had great success growing are: basil, bush beans, eggplant, parsley peppers, squash and tomatoes. 
Beefsteak Tomatoes
 The very first year we started we simply grew peppers and herbs in the 4' x 4' square.  I had read that peppers were relatively disease resistant, good producers and low maintenance!  I simply bought several different types at our local nursery and planted them a foot apart.  Then in the front of the bed I planted parsley, cilantro and basil.  I planted one tomato plant in a pot on our deck and that was it!
Sweet Pepper (Carnival Mix)
Now is the perfect time to start planning your new garden for 2014.  Its cold outside and you have time to prepare.  You also have time to research.  I have several book suggestions you may want to check out under: Favorite Gardening Books

Take a look at these simple steps in the next month or so and I will expand on other tips and considerations!


STEP 1: Choose a sunny location

STEP 2:  Choose the type of garden

STEP 3: The better your soil the better your garden

STEP 4: Grow only vegetables you enjoy eating
Until then enjoy welcoming in the New Year!

12.18.2013

Planting Garlic


 This is the first year that we have planted garlic and its exciting to have something growing in the garden during the winter and early spring months.  I have heard that garlic is simple to grow and we decided it was worth trying! In the last post I shared tips on growing garlic and in this post I go further to explain how its planted. 

Tochilavri Garlic

"German White" Garlic is supposed to be an easy garlic to grow if its your first time planting garlic.   It is a very strong variety and easy to peel with a sweet flavor.  It grows well in most of the U.S. and loves cold winters in the north. 

"Tochilavri" Garlic also known as "Red Toch" has up to 18 cloves per bulb.  Its a good garlic to start with because each head produces many new plants.  It also matures earlier than other garlics.  It is a soft neck garlic - See more at: http://followingthemastergardener.blogspot.com/#sthash.25rfoalI.dpuf
"Tochilavri" Garlic also known as "Red Toch" has up to 18 cloves per bulb.  Its a good garlic to start with because each head produces many new plants.  It also matures earlier than other garlics.  It is a soft neck garlic.

German White Garlic
"German White" Garlic is supposed to be an easy garlic to grow if its your first time planting garlic.   It is a very strong variety and easy to peel with a sweet flavor.  It grows well in most of the U.S. and loves cold winters in the north.

Tochilavri (left) German White (right)
Life was busy around our house and the garlic arrived in the mail before I was ready to plant.  I kept it in the refrigerator for a week until I was able to plant around November 16th. It was a very simple planting process.


1. First I broke up the cloves in each bulb.  


2. Then I added an organic fertilizer to the soil and mixed it in with a rake.

  Press them 1 1/2" inches deep into the soil about 6-8" apart.    - See more at: http://followingthemastergardener.blogspot.com/#sthash.25rfoalI.dpuf
3. Next press the cloves 1 1/2" inches deep into the soil spacing them 6-8" apart.
 4.  Then add about 6 inches of leaves (straw or dried grass clippings) for mulch.

In about 4 to 8 weeks (depending on the weather) you should see shoots growing.  
Garlic planted in front portion of BED #4 (far right)
Note: It snowed the week after I planted the bulbs so I won't be seeing any shoots. The bulbs stop growing in the winter and then start up again in the spring.  Then sometime in June you harvest!

11.10.2013

Growing Garlic

PLANTING GARLIC IN RAISED BED #4
From left to right Bed #1 through #4
For the first time we decided to plant one bed over the winter.  Garlic was the appropriate choice to plant for the fall!  Last week we ordered 2 different types of garlic : German White & Tochilavri.   

"German White" Garlic is supposed to be an easy garlic to grow if its your first time planting garlic.   It is a very strong variety and easy to peel with a sweet flavor.  It grows well in most of the U.S. and loves cold winters in the north. 

"Tochilavri" Garlic also known as "Red Toch" has up to 18 cloves per bulb.  Its a good garlic to start with because each head produces many new plants.  It also matures earlier than other garlics.  It is a soft neck garlic.  

SOWING GARLIC
1. To protect the cloves from fungal diseases you can soak them in a jar of water containing a tablespoon of baking soda and a tablespoon of liquid seaweed for a couple of hours before planting.  

2. Sow the cloves from mid November to December.  Press them 1 1/2" inches deep into the soil about 6-8" apart.   

3. Use about 6 inches of straw or dried grass clippings mixed with leaves as mulch.  You could see shoots growing in 4 to 8 weeks depending on the weather.  Bulbs will stop growing in the winter and start again in the spring.  

11.08.2013

Fall Beauty

 He changes times and seasons; he removes kings and sets up kings; he gives wisdom to the wise and knowledge to those who have understanding    
Daniel 2:21 ESV

Fall is my second favorite season of the year.  Everywhere I look the ground and trees are an array leaves in colorful tones of reds, oranges, yellows and brown.   I love that every leaf is unique in the color pattern that it displays.  

As we go through this next season I find that there are many new mountains to climb in my life and I find the same in many of my friends and families lives.  I am thankful that above all else God is faithful for there is a promise that spring will return once again. 


This week there were a couple of items that I finished up in the garden that I wanted to share with you.  We also have decided to try and grow some garlic during this fall and winter.  Read below to find out the details!   

11.02.2013

Eggplant Parmigiana


Eggplant is one of those vegetables that people seem to either love, hate or have never tried.  My husband will admit that he had never tasted it before we were married.  The first time he had my Eggplant Parmesan he became a fan.  He compared it to lasagna.  This is recipe I recommend to try Eggplant for the first time!  
1 large eggplant flour, for dusting 1 egg 1/2 pound mozzarella cheese 3 cups milk 1 tablespoon clarified butter 2 teaspoons olive oil 1 jar of marinara sauce 1 cup dry bread crumbs 3/4 cup Parmesan cheese
Read more at http://www.recipelion.com/Casserole-Recipes/Olive-Garden-Eggplant-Parmigiana/ct/1#qfTDAgcMQZmISZHH.99

Serves: 3 or 4 
EGGPLANT PARMIGIANA INGREDIENTS:
3 or 4 small Eggplant OR 1 large Eggplant
Tomato Sauce (I used Prego Spicy Sausage)
3/4 cup Panko Bread Crumbs
5 oz. Shredded Mozzarella Cheese (or Italian Blend)
1/2 cup Parmesan Cheese
1 Green Pepper (Optional)
1 Egg                         

COOKING STEPS:
 Preheat Oven to 350 degrees
STEP 1: Cut green stem off Eggplant
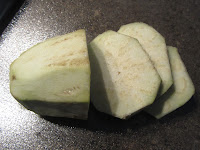
STEP 2: Peel skin off Eggplant
STEP 3: Cut Eggplant into 1/2" slices
STEP 4: Put Eggplant on cookie sheet and salt first side- wait 15 min- then flip and salt the other side- wait 15 more minutes.  Next rinse and drain the Eggplant. Pat dry and set aside.
(Eggplant can have a bitter taste before you cook it.  I recommend the process of "degorging" the fruit by salting, rinsing and draining it.  This helps to remove any bitterness.)

10.22.2013

Clean out your Garden!

 My little gardener helped me harvest the last of the vegetables!  Its been fun to see how excited he gets about helping in the garden and next year is going to be even more fun.  We are thinking of either dedicating a portion of a raised bed for him to plant or adding one small bed in the center of the garden for him to dig around in.
5 Eggplant, Green Beans and Tomatoes
This is the time of year when I get slightly bummed out about having to dig out all the plants and the last of the flowers.  Its time and everything is ready to be pulled up, but I always wish things could stay warmer just a bit longer! 

You may be asking.....why do you have to clean out the beds?  Can't you just leave everything to decompose until spring?  Well you could do that but that may also cause pests, weeds and diseases to overwinter in your beds and then when the temperature warms up in the spring you have problems to deal with!

There isn't anything difficult about cleaning out the beds you just need to find the time to get it done.  I prefer to clean them out before it gets uncomfortably cool outside.  One thing to remember is this: don't compost plant material or flowers if the plant has had any type of disease or infestation.  (You don't want any diseases or problems when you spread your compost on your beds in the spring!)  Its best to have a clean start to the year. Instead put that plant material in a brown yard bag and take it to your curb for the trash to pick up. 
The last of the blooming Zinnias

9.18.2013

Using Winter Row Covers

Winter Row covers to the rescue!
I had never heard of "Floating Row Covers" before researching them last year.  I can officially say after a year of using them in our garden that I highly recommend their use.  

First "Floating Row Covers" are simply a special type of fabric that you use to cover your plants.  I say special because this fabric still allows light, water and air for your plants to grow.  There are several different types of fabric you can purchase.  This year we bought 2 different types: 
Current Garden picture (Sept 2013)

The first is  Garden Quilt Cover Fabric which allowed us to extend our growing season in Spring and we are currently using it this Fall. (This fabric protects down to 24 degrees F with 60% light transmission).

The second is Summerweight Garden Fabric this fabric protected our plants from pests in the spring and early summer.  The plants were able to grow and mature and then we removed the covers when they started flowering.  (This fabric transmits 85% light to plants with frost protection to 28 degress F).

9.11.2013

Humbled by The Master

I have to admit at the end of August I had given up on the garden.  I had decided that it was time to start cleaning out the raised beds.
The garden on Aug. 23rd (before I pulled up the left flower bed)
Two weeks ago I could tell that the Bush Beans were through so I pulled up all the plants.  The left flower bed was also in bad shape so I pulled up all the Sunflower stalks and the wilted Zinnias.  I decided to leave the rest of the plants in the raised beds because I just couldn't bear pulling them up.  I glanced at the Eggplant and Peppers in the last bed and prematurely concluded that we had wasted our time starting them from seed and dedicating almost the entire bed to these plants. 
Bush Beans just before I cleaned out the bed


Eggplant first sign of fruit Aug 23rd
 I tend to have an optimistic personality, but I still have my days.  Lately I have been praying that God would help me trust Him more with my life.  I find that when a large amount of things turn out differently than I have planned and I can't understand it that my grip tightens on wanting control and an immediate solution.  I am not the best with waiting and feel the need to figure things out on my own.      

When things like this happen someone will usually say "God will never give you more than you can handle."  Well the truth is that this statement is not biblical and I am almost certain it doesn't provide reassurance to those with difficulties.  

The truth is: We will have trials in our lives that are larger and more difficult than we can handle alone on our own strength.  God will allow us to be stretched beyond our strength and human abilities to show us our need for Him, reminding us that His strength is limitless, and to deepen our faith.    


Red Pepper plant
When I focus on this truth then I am moved to focus on God and allow Him to be Lord over my life.  Then I can relinquish control.  

I walked out into the garden today and was reminded of this truth.  I had thought everything was "over" in the garden and that it was time to pull up more plants.  After ignoring the garden for the past week it seemed the end was inevitable. 

I found myself humbled when I discovered the garden was still very much alive.  The Pole Beans had bloomed and formed beans, the Summer Squash had produced again, and I found 3 Eggplant and 2 Peppers ready to pick!


Now I know that this garden harvest is not the solution to all my challenges.  But today for me personally, it was a reminder that God is in control of my life and that he provides amazing surprises. 

May you be encouraged by this verse:
Those who know your name will trust in you, for you Lord, have never forsaken those who you love.  Psalm 9:10

9.02.2013

Purple Tomato Seedlings & the Clay Pot

I have a large clay pot that was given to me when my mom no longer needed it.  The first year we moved to our house I decided to use it on our deck to grow some small yellow tomatoes.  Everyone who came over was amazed at how big the tomato plant was and how much it produced.  Flash forward.  This is the fourth year I have planted a tomato in this pot.  I don't know what the deal is but this pot was made to grow tomatoes!!   
The "Amazing" Tomato Pot

Next year I want to look around and see if I can find another large clay pot similar to this one.  All the tomatoes I have grown in this pot have tripled the size of the other tomatoes I have grown.   Last week I was able to harvest 13 tomatoes from the plant (with at least 4 to 5 more to come) and then make a yummy cold salad using some of the tomatoes.  Fresh tomatoes are incredible!
Fresh Mozzarella Tomato Salad with Basil from the Garden!
Beefsteak Tomatoes

8.21.2013

Alabama Garden Tour #2

Below you will see just a taste of the bountiful harvest from Garden Tour #2!  This garden is located in the sunny southern state of Alabama.  Take a look and be encouraged learning that even a small garden can produce many tasty vegetables.
Eggplant, Red Peppers, Tomatoes and Basil
I was encouraging a family member to start a garden at their home in Alabama.  However, there were several challenges.  First, the yard was very small and didn't have space for a typical raised bed.  Second,  they needed a bed that was easy to assemble and something that could be disassembled easily if they had any future relocation.   Then most important of all it needed to be attractive so that it was accepted by the homeowners association.   I found this incredible solution at Gardener's Supply. It's called the 4 in 1 Modular Raised Bed and can be arranged in 4 different ways to fit your space. 
This Modular raised bed fits into the landscaping.
I passed along my new found knowledge companion planting to help guide her selection of plants.  She choose (2) Eggplants, (2) Peppers, (2) Tomatoes, Basil & (1) Zucchini.   She also added a drip irrigation hose to water the plants.   The plants were planted at the end of May, because that is when she received the raised bed.  However, next year she can start planting earlier because of the longer growing season in Alabama.
Drip irrigation hose on far right
Below you can see a picture of the bed in August.


Happy Happy Tomatoes!
 She also experimented by growing a Zucchini and a Tomato plant in pots on her deck.  These plants received more sun in this location and their leaves started to show signs of distress.  I researched this problem and found out that plants can get sunburn!  They can get yellow spots on their leaves and fruit and then the plant tissue is affected. 
Zucchini plant in pot
To remedy this she moved the plants on the deck to an area that was in the sun during the morning and shaded in the afternoon.  In the raised bed she then added a lightweight white fabric covering over the Zucchini plant. 


Banana Tree
Banana Trees
This garden also has (4) Banana trees!  At first you may think that these plants could only grow in the south, but I have discovered that you can grow a  Dwarf Cavendish Banana Tree if you live in zones 4-11.  Our garden is in zone 6 so we would make the cut.  In order for it to work for us we would have to keep the plant in a large pot and then bring it into the house during the late fall & winter.  (For the fruit to ripen it needs a frost free environment). This variety is dwarf-sized maturing to 8-10 feet in height.
  

You too can make your garden fit the yard that you have whether it is small or large!  There are even solutions if you have no yard at all!  You can use a planter, an elevated bed, pots and you can even grow vegetables and fruit on your apartment balcony.   Get creative and enjoy!

8.14.2013

Sunflowers & Winter Squash Harvest

This past week I was able to harvest a variety of vegetables from the garden.  Winter Squash, Green Beans, Cucumbers, Summer Squash, Watermelon, Onions, Carrots & for the first time Sunflowers (for their edible seeds of course)!
Green Beans, Spaghetti Squash, Burgess Squash, Cucumbers & Summer Squash
How can you tell when to harvest Winter Squash?  The best way to tell is to push your nail in the squash.  It won't leave a visible dent if it is ripe.  You may also be able to tell when the vine starts to die and turn brown drying out (keep in mind this may also indicate that your plant has a disease, is under stress or early frost has caused this.)  

Cut the squash from the vine and leave about 3 inches of the stem.   Winter Squash can last in storage anywhere from a month up to 6 months (depending on the variety). 

Typical Shelf Life of Winter Squash:
1-2 Months: Acorn, Delicata and Spaghetti Squash
2-3 Months: Buttercup/Butternut & Pumpkins
5-6 Months: Buttercup and Hubbard

How to harvest Winter Squash properly to last in storage: 
1. Place the unwashed squash in a spot that is warm and sunny for around a week to two weeks.  
(NOTE: Don't do step 1 if you have Acorn Squash- move it to a cool location right away.)
2. Store them in a room that is cool and dry with good air circulation.  (Above 50 degrees F)


Watermelon ready to eat!
We have been amazed at the Sunflowers growing in the beneficial beds in front of our garden.  This is the first year that we have grown Sunflowers and they are incredibly beautiful.  We grew 2 different types: Summertime Mix (more for color and cutting) and Russian Mammoth (for their edible seeds).  See pictures and tips on drying Sunflower seeds below

Sunflower Summertime Mix F1 
(Helianthus Annuus) 
- mixture of colors
- good for mass planting and cutting gardens
-pollen free hybrid collection
-height 4'-5


Summertime Mix- beautiful red/orange color and light yellow flowers
Russian Mammoth Sunflowers 
(Girasol Mammoth Ruso)  
-9'-12' tall with 10'-14' flowers
-easy to grow heirloom
-gigantic single flower heads on stalks
-dry to produce thin-shelled edible seeds


We still can't believe how tall these Sunflowers are!  They are truly Mammoth in size.

Process for drying Sunflowers (indoors):

1. Harvest when wilted &  some yellow petals have fallen off. 
2.  Leave 3 inches of stem when cutting off head of Sunflower. 
3. Secure string around stem of flower. 
4. Hang Sunflowers upside down in warm dry area with good ventilation.
5. Check drying Sunflowers each day & collect seeds which have fallen off. 
(Seeds are dry & ready when the green part of the Sunflower is dark brown & dry).
6. Using your hand rub the top of the flower head & the seeds will come out. 
7. Rinse with cold water and drain.  
8. Allow to air dry for a couple of days on a towel. 
(If desired you can put them on a cookie sheet & toast in oven).
9. Store or eat your Sunflower seeds!

(IF DRYING OUTDOORS DO THE FOLLOWING): 
Do not cut off Sunflower heads.  Instead put them in brown paper bags and tie a string around the bottom of the stem to close the bag.  Continue to check each day.  When ready
cut the Sunflower off stalk leaving 10-12" of stem.  Leave paper bag on flower until it is cut off so you don't loose any seeds.  Continue above steps 6 through 9.


Sunflowers hanging in our garage to dry


Sunflower on the end is about ready for us to remove seeds.
Its now August and the vegetables in the garden are slowing down their production.  The weather has been unusually cool during these summer months.  We have really enjoyed being in the garden this spring and summer.  Its going to be hard to transition to fall this year.  Soon it will be time to clean up the garden and plant a cover crop for the winter.  Then in late fall and early winter it will be time to plan again for next year. 


I will miss the Zinnia flower arrangements in my kitchen this fall!
More to come next week with Garden Tour #2!