5.31.2013

Garden Update- from May 22nd

Just a quick update with some earlier pictures from April and those taken on May 22nd of the plants growing in the garden.  Its always fun to watch your plants growing!  These pictures are a great way to capture the changes that take place.

BED #1: Peas, Asparagus & Parsley (Tomatoes to follow Peas)
April- Parsley seedlings and Asparagus just starting to grow
May 22nd- Parsley growing with the Asparagus (proof that companion planting works!)
May 22nd- Parsley, Asparagus and Peas.  Happy Happy Happy!

May 22nd- Flowers starting to bloom on peas (planted March 17th)

BED #2: Peas, Broccoli and Cauliflower 
(Beans, Corn Winter Squash & Tomatoes to come)
ro
April 29th Broccoli & Cauliflower seedlings planted
May 22nd- Broccoli & Cauliflower have tripled in size!
BED #3: Onions, Carrots, Peas (Beans, Carrots & Summer Squash to be planted)

April 29th-Peas & Onions


May 22nd- Peas & Onions

 BED #4: Zucchini, Peppers, Eggplant & Cucumbers 


May 19th- Just planted this bed!
Flower Beds with Beneficial Plants:

Seedlings just starting to emerge

Planting Zuchinni, Peppers, Eggplant, & Cucumber

We planted the Zucchini, Peppers, Eggplant and Cucumber plants in the garden a week earlier than planned on May 19th.  Because we have row covers with Garden Quilt Cover Fabric we felt confident that these heat loving plants could be transplanted with confidence. 
Normally you would wait to transplant eggplants into the garden until soil & air temperatures are consistently in the 70’s. For peppers you hold off until the soil is 65 degrees F.


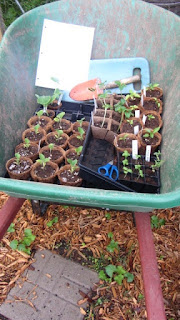
Wheelbarrow with all supplies for planting
Laying out plants with Square Foot Gardening Method (SFGM) for spacing
This year we decided to start all the squash seeds indoors (our first time trying this) to give the plants a head start.  I planted them all in pots that decompose when planted because its best if you don't disturb their roots. All the seedlings were successful and we actually gave many away to friends because we didn't have space for all of them in the garden. 


Cucumbers (to grow up trellis) with Eggplants in front
This is our first year growing cucumbers so it will be a learning experience.  We are going to grow them vertically which is recommended in SFGM so we can conserve space in the garden for other plants.  

Below is a picture of the actual layout of Bed #4 and then beside it is the plan we drew up this winter using the SFGM spacing.
Plan for BED #4 using SFGM


Bed #4  ready to plant
Plants in BED #4 (starting from the top or back of the bed) : 
(16) Peas (after peas replant spaces)* with (8) Cucumbers
(12) Black Beauty Eggplant
(4) Red Bell Pepper
(4) Sweet Pepper
(2) Dark Star Zucchini

*This is the first year we have attempted to use succession planting (using efficient use of timing by planting a cool season spring crop followed by a heat-loving summer crop).  Unfortunately the timing didn't work out completely.  The peas were planted on March 17th but we had snow and because of that the peas took longer than expected to start growing. 
Next year we are going to have to start the peas earlier so that they have produced before we need to do the next planting.  I ended up just pulling out the peas in this bed (this bed only had 4 plants) so I could plant the cucumbers in their place. 


Pepper plant
All of these plants were grown in pots that I could plant in the garden.  All of these heat loving plants have a delicate root system so this way I didn't have to worry about them going into shock when they were planted in the garden.  You simply cut 1/2" off the top of the pot and then place the pot in the hole you have ready.  Cover up with soil, water and you are done!
Transplanted seedlings
We are excited to see the transplanted seedlings growing and are wondering how they will compare to those we bought last year.  At first we were a little concerned because our seedlings are much smaller in size than those we purchase.   However, I have read that smaller stockier transplants generally outperform those purchased because they experience far fewer problems with transplant shock than large plants.  Only time will tell!


Row Cover with Garden Quilt Fabric
Last Step: always finish by watering your newly transplanted plants.  One important tip: water around your plants not wetting the leaves.  Plants can develop fungal diseases if the leaves are wet going into the night. 

5.25.2013

Attracting Beneficials (Nature's Pest Control)

You may remember from an earlier post that we decided to add a flower bed in front of garden this year.  The reasons were twofold: we wanted to attract beneficials to our garden as well as add aesthetic appeal.  (Also our amazing neighbors had extra landscaping stones that they gave us for free)!
 

I had learned from my Square Foot Gardening Book that marigolds helped control pests and attract beneficial insects.  So as soon as I started gardening I planted marigolds by my plants.  This was a step in the right direction, but this past winter I discovered there was more that could be done.

It all started when I was researching ways to have a more productive organic garden (there is always room for improvement and gaining knowledge) and I came across information on attracting beneficials to the garden.  I found it was about more than just planting a few marigolds.  One helpful fact sheet I found was: A guide to beneficials in the Home Garden

Here are some of the quick tips I learned to attract beneficials:
1. Include plants of varying heights
2. Plant at least 6 varieties of plants that attract beneficial insects
    (for ideas on plant varieties see link to site @ end of post)
3. Provide water for insects (as simple as a small saucer on a dry day)
4. Give insects on the ground some cover (stepping stones, mulch, flat stones, boards)

In response to this I decided to add a bird bath, a bird house and some decorative garden elements to the flower beds (we already had stones.)  I also designed the beds to have the taller plants starting in the back and the shorter plants in the front.  
Spacing out Zinnia seedlings
So after our last spring frost (mid May) I gathered all my flower seeds and zinnia seedlings and started the planting process. 
 Transplanted Zinnia seedlings


The flowers I choose to plant in the beds:

Echinacea- Purple Coneflower
Poppy- Giant Peony Mix
Lavendar- Lady
Marigolds- Eskimo White
Sunflowers- Summertime Mix
Sunflowers- Russian Mammoth
Wildflower- Butterfly Mix
Yarrow- White
Zinnias- both Cut and Come again & Lilliput (some were seedlings I planted.)

I also found this site that lists flowers to plant to attract beneficial insectsIt specifically lists out the types of insects that each flower will attract. 

This site provides easy to understand tables listing the pest and then has a table for attracting beneficial insects by plant. 


Seedlings and Seeds planted! Now its time to sit back & watch them grow.


5.24.2013

Hardening Off Seedlings

Your seedlings that you started indoors are looking good and you are ready to plant them in the garden.  So you are thinking you will just take them outdoors and plant them directly in the garden right?  Not exactly.  Remember these seedlings were germinated indoors and are not acclimated to the outdoors just yet.  So you have one more step to go through before planting. 


Cucumber, Eggplant, Squash, Basil, Zinnia, Tomato & Pepper Seedlings
Hardening off is a process of slowly taking your seeds outdoors and allowing them to adjust to their new environment.  During this process plant growth slows and more food is stored internally in the plants increasing the thickness of their outer leaf layers. 

I like to think of it like this: my seedlings are still babies and need extra care and attention.  They are still vulnerable to the harsh sun and the changes in temperature.  Up to this point they have been in my home in a controlled environment with the same amount of light and a relatively predictable temperature.  It is now my job to help them adjust to the outside changes before they are planted so that they can survive.
Seedlings beginning the hardening off process in the shade
Here is how I went about hardening off our seedlings:

May 15th- First day I set out seedlings labeled as tender (see chart below)
DAY 1:  Find a protected/covered area and set your seedlings under this area for 1 hour. Then return them to your indoor seed starting area (ours is under lights in the basement).

DAY 2: Same process but leave them out for 2 to 3 hours.

DAY 3:  Same process but leave them out for 4 hours.*

DAY 4:  Same process but leave them out for 5 hours.*

DAY 5:  Same process but leave them out for 6 hours.*

DAY 6:  Same process but leave them out for 7 hours.*

DAY 7:  Same process but leave them out for 8 hours.*

DAY 8:  Let plants spend the night outdoors under the covered/protected area.

DAY 9 thru 14: Gradually increase the amount of time the seedlings are spending in the sun.  

*you can also gradually introduce the sun (starting on day 3) in the morning light for about 1 hour then pull them back to the shade for the rest of the time.  

(This process will take a least 7 days but could go on for up to 10 days depending on your specific zone).

I choose to just do this process for 8 days, but the closer you go to 10 days the better the chances of your plants surviving the transplant process.  Above all make sure you don't skip this hardening off process.  You worked hard to take care of your seedlings and it would be very disappointing to loose them at this point!

NOTE:  Be aware of the weather and temperature outside during this process. (See chart below)  If the temperatures are going to drop lower than the minimum temperature recommended for your crop bring them indoors.   

Recommended Minimum Temperatures

Hardy
40 degrees F
Broccoli, Cabbage, Onions, Leeks, Parsley
Half-Hardy
45 degrees F
Celery, Lettuce
Tender
50 degrees F
Pumpkin, Squash, Sweet Corn

Tender
60 degrees F
Cucumber, Muskmelon
Tender
65 degrees F
Basil, Peppers, Tomatoes


5.17.2013

Asparagus Beetles

I went out to check on the garden this afternoon and found tiny spotted bugs on the asparagus plants.  I picked them off and got rid of them one by one.  (We have chosen not to use pesticides in our garden.)  There were 2 different types of bugs on the plants and I discovered that we have both species of asparagus beetles.  The common asparagus beetle and the spotted asparagus beetle.  Wonderful.

Common Asparagus Beetle
Spotted Asparagus Beetle
We had decided to do row covers this year to keep the insects from attacking the plants, however I removed the row covers from the asparagus 2 weeks ago.  We didn't make our PVC hoops tall enough to accommodate the height of the asparagus.  (This is something we are going to need to adjust for next year.)   At the same time I can't be too hard on myself because I just discovered they could have come from the four asparagus we transplanted from our other bed earlier this year (they are known to overwinter in the hollow stems of old asparagus plants). 
Common Asparagus Beetles on our plants!
I will keep you updated on the battle with the beetles.  Right now I am going to check them 2 times a day and continue removing any beetles by handpicking.  Let the games begin!


5.16.2013

Starting Plants from Seed

How do you determine what plants to start indoors from seed?  If this is your first time starting seeds I would recommend selecting a few types of vegetables and then buying the rest.  This will allow you time to experiment with starting from seed and learn what adjustments you need to make.   Some vegetables are more difficult than others to start from seed (we have learned this from personal experience).   

This is the first year that we decided to try and grow our own plants from seed.  Normally I buy tomatoes, eggplants, peppers, basil, parsley and cilantro plants from a garden center.  Then we directly sow the rest of our vegetables in the garden as seeds (such as beans, squash, and carrots).  

You may be wondering what prompted me to try this?  I would say a combination of curiosity and the future idea of saving money.  This year we doubled our planting area adding 2 more raised beds (for a total of 4 beds) and we knew the cost would add up quickly.   So this winter I did my research and we decided to take the plunge and grow as many plants from seed as possible.  We both figured that if it didn't work we would just go out and buy the plants we needed.  


In previous posts you have seen the Parsley, Broccoli, Cauliflower, Tomato, Eggplant, Peppers and Basil that we successfully started from seed.   I didn't get around to taking pictures when I first started those seeds, so today I am going to make sure that I show you the steps I took in detail. 

In this post I am going to be planting squash, zucchini, watermelon, and cucumbers.  Typically you just start these types of plants from seed right in the garden, but I wanted to try and give them a head start this year.  If you try squash, zucchini, watermelon or cucumbers you need to plant the seeds in pots that decompose when you plant them directly in the ground (such as peat pots or coconut coir pots)With these types of plants you want to disturb the roots as little as possible.  When you are ready to plant them in the garden you just tear 1/2" off the top of the pot and plant the entire pot and its contents directly in the ground. 

5.01.2013

Making Floating Row Covers

As I shared in a previous post, last year we battled the squash vine borer in our garden and lost some plants (squash and zucchini) to this insect.   I knew at the end of last year that I had to find a solution.  We garden organically so I spent some time reading about different controls that would stop this insect from attacking again. 

I kept reading about Floating Row Covers in books but for some reason I had a hard time figuring out how they would work and what they would look like.  I finally did a Google search and discovered they were just a special type of fabric made out of spun fiber which you cover your plants with.  The idea is to create a barrier between the insect and plant that sunlight and water can still pass through.  Overall this seemed to be the most effective method for organic gardening. 

So this year we were ready to try out the Floating Row Covers.  Our raised beds had already been designed with 1" pieces of PVC pipe screwed inside.  We just needed to add the 1/2" pieces of PVC pipe to form the semi-circles to hold up the fabric.  

1/2" pieces of PVC pipe being added to Raised Bed
As far as the fabric goes I ordered 2 different types from Gardener's Supply Company.  The Garden Quilt fabric and then the Summer weight fabric.  I decided that would allow us the most flexibility.  The Garden Quilt fabric would allow us to start planting earlier in the spring and later in the fall (for light frosts down to 24 degrees).  The Summer weight fabric was lighter weight and would be used the rest of the season when it was warm outside. 

Once we got the fabric my next challenge was figuring out how to secure it over the raised beds. I tried earth staples that were metal and then plastic.  The strong winds ripped those out of the ground and the fabric was flapping in the breeze.  Finally I did some more research and came up with a new design using green metal plant stakes and large metal binder clips. 

I decided to share this design because it has really helped us.  Its simple to use and saves me time when tending to the plants.  It will also extend the life of the fabric because its not tearing holes in it.  Instead you just slide out the plant stakes at the end of use and fold the fabric to store for the next year.  I have also already switched from the Garden Qulit fabric to the lighter Summer weight fabric.  I just slid out the plant stakes from one type and put them in the other type of fabric which saves resources.

MATERIALS NEEDED (per raised bed):
1/2" PVC pipe cut into (5) 5 foot sections
(2) 7 ft. coated green metal plant stakes 5/8" dia.
(2) 4 ft. coated green metal plant stakes 1/2" dia. 
(10) large binder clips 
12 ft. garden fabric*

*I ordered the 6' x 50' size in both fabrics and they covered all 4 raised beds with a little fabric left over 

Step 1: Cut Fabric to 12'-3" length
Step 2: Fold both long edges of fabric over 2 1/2 inches then pin fabric. Repeat with both short sides of fabric but pin fabric over 2 inches.  All four sides should be pinned ready to sew.  See images below for more detail.
Close-up of pinned fabric
Step 3: Sew all four edges of the fabric.  See images below for detail on finishing ends.
2 inch overlap on 2 shortest ends
2 1/2 inch overlap on 2 longest ends
Step 4: Finish off the ends where the 2 sewn edges meet.
Make sure to leave opening on ends for green metal plant stakes to go through.
Remove any pins left in the fabric.
Your fabric should now look like this with all four ends of fabric sewn.
Step 5: Lay out the green metal plant stakes.
Match the two longest stakes to the longest sides of he fabric and
the two shortest to the shortest sides of the fabric.
Step 6: Slide green metal plant stakes into each sewn pocket
Note: you will have extra fabric when you slide the plant stake into the pocket.  Just gather it onto the stake and then after you place it on the bed you can slide the extra fabric to the end.  Its better to have some extra for wiggle room!

Insert 1/2" PVC pipe (to form hoops) into 1" PVC already in raised bed
Add bricks (or other weight) to ends
Gather extra fabric at edge
Gathered fabric
Clip with large binder clip and push down toward green metal plant stake.
Make sure green metal plant stake is secured under binder clip. 
The floating row covers can be left in place all year if you are growing root crops (such as carrots, turnips, and onions) or leafy greens.  If the crops need to be pollinated to produce (beans, squash, eggplant, tomatoes and others) you will either need to remove the row covers when they start to flower or pollinate by hand.