Showing posts with label Organic Gardening. Show all posts

9.18.2013

Using Winter Row Covers

Winter Row covers to the rescue!
I had never heard of "Floating Row Covers" before researching them last year.  I can officially say after a year of using them in our garden that I highly recommend their use.  

First "Floating Row Covers" are simply a special type of fabric that you use to cover your plants.  I say special because this fabric still allows light, water and air for your plants to grow.  There are several different types of fabric you can purchase.  This year we bought 2 different types: 
Current Garden picture (Sept 2013)

The first is  Garden Quilt Cover Fabric which allowed us to extend our growing season in Spring and we are currently using it this Fall. (This fabric protects down to 24 degrees F with 60% light transmission).

The second is Summerweight Garden Fabric this fabric protected our plants from pests in the spring and early summer.  The plants were able to grow and mature and then we removed the covers when they started flowering.  (This fabric transmits 85% light to plants with frost protection to 28 degress F).

5.25.2013

Attracting Beneficials (Nature's Pest Control)

You may remember from an earlier post that we decided to add a flower bed in front of garden this year.  The reasons were twofold: we wanted to attract beneficials to our garden as well as add aesthetic appeal.  (Also our amazing neighbors had extra landscaping stones that they gave us for free)!
 

I had learned from my Square Foot Gardening Book that marigolds helped control pests and attract beneficial insects.  So as soon as I started gardening I planted marigolds by my plants.  This was a step in the right direction, but this past winter I discovered there was more that could be done.

It all started when I was researching ways to have a more productive organic garden (there is always room for improvement and gaining knowledge) and I came across information on attracting beneficials to the garden.  I found it was about more than just planting a few marigolds.  One helpful fact sheet I found was: A guide to beneficials in the Home Garden

Here are some of the quick tips I learned to attract beneficials:
1. Include plants of varying heights
2. Plant at least 6 varieties of plants that attract beneficial insects
    (for ideas on plant varieties see link to site @ end of post)
3. Provide water for insects (as simple as a small saucer on a dry day)
4. Give insects on the ground some cover (stepping stones, mulch, flat stones, boards)

In response to this I decided to add a bird bath, a bird house and some decorative garden elements to the flower beds (we already had stones.)  I also designed the beds to have the taller plants starting in the back and the shorter plants in the front.  
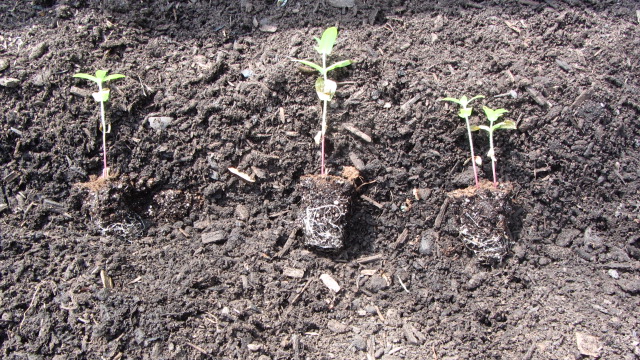
Spacing out Zinnia seedlings
So after our last spring frost (mid May) I gathered all my flower seeds and zinnia seedlings and started the planting process. 
 Transplanted Zinnia seedlings


The flowers I choose to plant in the beds:

Echinacea- Purple Coneflower
Poppy- Giant Peony Mix
Lavendar- Lady
Marigolds- Eskimo White
Sunflowers- Summertime Mix
Sunflowers- Russian Mammoth
Wildflower- Butterfly Mix
Yarrow- White
Zinnias- both Cut and Come again & Lilliput (some were seedlings I planted.)

I also found this site that lists flowers to plant to attract beneficial insectsIt specifically lists out the types of insects that each flower will attract. 

This site provides easy to understand tables listing the pest and then has a table for attracting beneficial insects by plant. 


Seedlings and Seeds planted! Now its time to sit back & watch them grow.


5.01.2013

Making Floating Row Covers

As I shared in a previous post, last year we battled the squash vine borer in our garden and lost some plants (squash and zucchini) to this insect.   I knew at the end of last year that I had to find a solution.  We garden organically so I spent some time reading about different controls that would stop this insect from attacking again. 

I kept reading about Floating Row Covers in books but for some reason I had a hard time figuring out how they would work and what they would look like.  I finally did a Google search and discovered they were just a special type of fabric made out of spun fiber which you cover your plants with.  The idea is to create a barrier between the insect and plant that sunlight and water can still pass through.  Overall this seemed to be the most effective method for organic gardening. 

So this year we were ready to try out the Floating Row Covers.  Our raised beds had already been designed with 1" pieces of PVC pipe screwed inside.  We just needed to add the 1/2" pieces of PVC pipe to form the semi-circles to hold up the fabric.  

1/2" pieces of PVC pipe being added to Raised Bed
As far as the fabric goes I ordered 2 different types from Gardener's Supply Company.  The Garden Quilt fabric and then the Summer weight fabric.  I decided that would allow us the most flexibility.  The Garden Quilt fabric would allow us to start planting earlier in the spring and later in the fall (for light frosts down to 24 degrees).  The Summer weight fabric was lighter weight and would be used the rest of the season when it was warm outside. 

Once we got the fabric my next challenge was figuring out how to secure it over the raised beds. I tried earth staples that were metal and then plastic.  The strong winds ripped those out of the ground and the fabric was flapping in the breeze.  Finally I did some more research and came up with a new design using green metal plant stakes and large metal binder clips. 

I decided to share this design because it has really helped us.  Its simple to use and saves me time when tending to the plants.  It will also extend the life of the fabric because its not tearing holes in it.  Instead you just slide out the plant stakes at the end of use and fold the fabric to store for the next year.  I have also already switched from the Garden Qulit fabric to the lighter Summer weight fabric.  I just slid out the plant stakes from one type and put them in the other type of fabric which saves resources.

MATERIALS NEEDED (per raised bed):
1/2" PVC pipe cut into (5) 5 foot sections
(2) 7 ft. coated green metal plant stakes 5/8" dia.
(2) 4 ft. coated green metal plant stakes 1/2" dia. 
(10) large binder clips 
12 ft. garden fabric*

*I ordered the 6' x 50' size in both fabrics and they covered all 4 raised beds with a little fabric left over 

Step 1: Cut Fabric to 12'-3" length
Step 2: Fold both long edges of fabric over 2 1/2 inches then pin fabric. Repeat with both short sides of fabric but pin fabric over 2 inches.  All four sides should be pinned ready to sew.  See images below for more detail.
Close-up of pinned fabric
Step 3: Sew all four edges of the fabric.  See images below for detail on finishing ends.
2 inch overlap on 2 shortest ends
2 1/2 inch overlap on 2 longest ends
Step 4: Finish off the ends where the 2 sewn edges meet.
Make sure to leave opening on ends for green metal plant stakes to go through.
Remove any pins left in the fabric.
Your fabric should now look like this with all four ends of fabric sewn.
Step 5: Lay out the green metal plant stakes.
Match the two longest stakes to the longest sides of he fabric and
the two shortest to the shortest sides of the fabric.
Step 6: Slide green metal plant stakes into each sewn pocket
Note: you will have extra fabric when you slide the plant stake into the pocket.  Just gather it onto the stake and then after you place it on the bed you can slide the extra fabric to the end.  Its better to have some extra for wiggle room!

Insert 1/2" PVC pipe (to form hoops) into 1" PVC already in raised bed
Add bricks (or other weight) to ends
Gather extra fabric at edge
Gathered fabric
Clip with large binder clip and push down toward green metal plant stake.
Make sure green metal plant stake is secured under binder clip. 
The floating row covers can be left in place all year if you are growing root crops (such as carrots, turnips, and onions) or leafy greens.  If the crops need to be pollinated to produce (beans, squash, eggplant, tomatoes and others) you will either need to remove the row covers when they start to flower or pollinate by hand.